
Did you know that for every inch the head moves forward in posture, its weight on your neck and upper back muscles increases by 10 pounds?
For example, a human head weighing 12 pounds held forward only 3 inches from the shoulders results in 42 pounds of pressure on the neck and upper back muscles. That’s the equivalent of almost three watermelons resting on your neck and back!
When you neglect your posture, you invite chronic back pain. Rounding your low back while sitting for extended periods of time in front of a computer, standing for hours stooped over, sleeping improperly and lifting poorly can all lead to debilitating aches.
Maintaining the natural lumbar curve in your low back is essential to preventing posture-related back pain. This natural curve works as a shock absorber, helping to distribute weight along the length of your spine. Adjusting postural distortions can help stop back pain.
Why posture’s so important?
Having good posture is about more than looking good. It helps you to develop strength, flexibility, and balance in your body. These can all lead to less muscle pain and more energy throughout the day. Proper posture also reduces stress on your muscles and ligaments, which can reduce your risk of injury.
Improving your posture also helps you become more aware of your muscles, making it easier to correct your own posture. As you work on your posture and become more aware of your body, you might even notice some imbalances or areas of tightness you weren’t previously aware of.
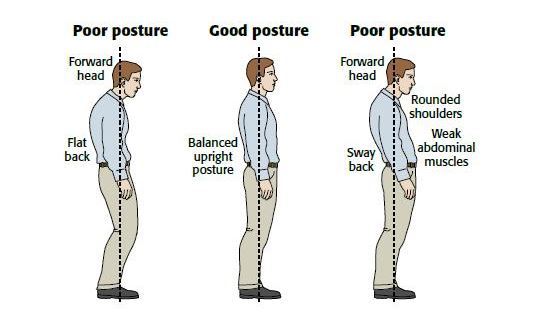
Is Your Posture Bad?
Let’s examine some examples of poor posture versus good posture.[3]
- Poor Posture: Rounded shoulders, slouching, head tilted forward, bent knees, pot belly
- Good Posture: Straight line from your ear to your shoulder to your hip, balanced and upright posture
A basic remedy to sitting all day is to simply get up! Frequently getting up from a seated position and doing these realignment exercises can help you reeducate your muscles from getting stuck in a hunched over cave man position.
1. Child’s pose

This resting pose stretches and lengthens your spine, glutes, and hamstrings. The child’s pose helps to release tension in your lower back and neck.
To do this:
- Sit on your shinbones with your knees together, your big toes touching, and your heels splayed out to the side.
- Fold forward at your hips and walk your hands out in front of you.
- Sink your hips back down toward your feet. If your thighs won’t go all the way down, place a pillow or folded blanket under them for support.
- Gently place your forehead on the floor or turn your head to one side.
- Keep your arms extended or rest them along your body.
- Breathe deeply into the back of your rib cage and waist.
- Relax in this pose for up to 5 minutes while continuing to breathe deeply.

This standing stretch releases tension in your spine, hamstrings, and glutes. It also stretches your hips and legs. While doing this stretch, you should feel the entire back side of your body opening up and lengthening.
To do this:
- Stand with your big toes touching and your heels slightly apart.
- Bring your hands to your hips and fold forward at your hips.
- Release your hands toward the floor or place them on a block. Don’t worry if your hands don’t touch the ground — just go as far as you can.
- Bend your knees slightly, soften your hips joints, and allow your spine to lengthen.
- Tuck your chin into your chest and allow your head to fall heavy to the floor.
- Remain in this pose for up to 1 minute.
3.Mountain Pose

Tadasana, or Mountain Pose, is a simple yoga position that can help improve posture. Mountain Pose focuses on upright body alignment, and it incorporates several aspects of good posture.
To do Mountain Pose:
- Stand upright with the feet hip width apart.
- Make sure to spread your weight evenly through both feet. Try gently rocking forward and backward to feel how variations in weight distribution affect posture.
- Keep a slight bend in your knees, squeeze your thighs, and tilt your tailbone down.
- Drop your shoulders down and back, so your chest comes forward
- Keep your shoulders relaxed and allow your arms to fall to the sides of the body with your palms facing forward.
- Inhale and exhale slowly for a few breaths.
4.Reverse plank bridge
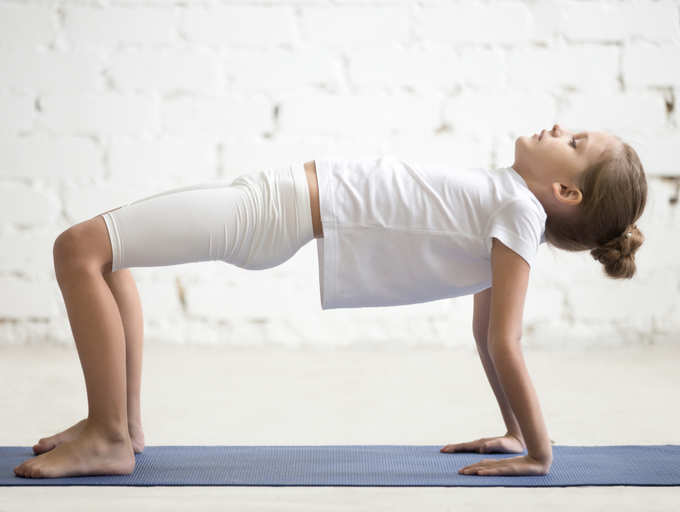
This is the most effective exercise for strengthening your lower back and straightening your hunched shoulders. This exercise works on different muscle groups including our erector spine, the middle trapezius, the hip flexors, hip adductors, hip abductors and the lumbar spine.
How to do it:
Step 1: Sit down on the floor with your legs extended in front of you.
Step 2: Place your palms behind your back. Your fingers can be either pointed backward or forward.
Step 3: Press your palms and heels on the floor and lift your pelvis off the floor. Your knees, pelvis, and shoulders should be in line.
Step 4: Look up to the ceiling, point your toes and keep your arms and legs straight.
Step 5: Pull your shoulders back so that your shoulder blades come together and at the same time push your chest up.
Step 6: Hold this position for 30 seconds. Increase the time gradually.
5. High plank
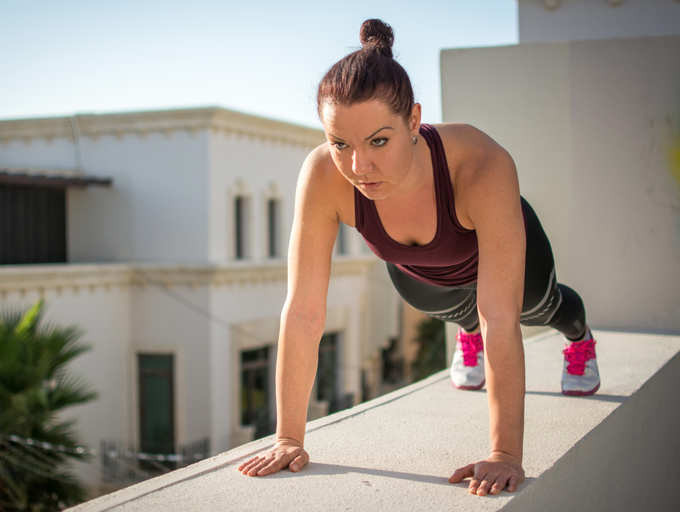
The high plank pose helps to relieve tension and pain from the body. It also helps to strengthen your shoulders, glutes and improves your balance and strengthens your core, which is crucial for good posture.
How to do it:
Step 1: Come on all fours and then lift your knees, straighten your legs to bring your body to full extension.
Step 2: Your feet should be shoulder-width apart and your palms should be directly below your shoulders, pressing against the ground.
Step 3: Elongate your spine and engage your abdominal, arm and leg muscles. Lengthen the back of your neck and look down at the floor.
Step 4: Hold this position for up to 1 minute and then go back to the normal position.
6. Side plank
To do this:
- From a high plank position, bring your left hand slightly in to center.
- Shift your weight onto your left hand, stack your ankles, and lift your hips.
- Place your right hand on your hip or extend it up toward the ceiling.
- You can drop your left knee down to the floor for extra support.
- Engage your abdominals, side body, and glutes as you maintain this pose.
- Align your body in a straight line from the crown of your head to your heels.
- Look straight ahead of you or up toward your hand.
- Hold this pose for up to 30 seconds.
- Repeat on the opposite side.
7. Downward-facing dog
This is a forward bend that can be used as a resting pose to balance out your body. The downward-facing dog pose helps to relieve back pain, while also strengthening and aligning your back muscles. Practicing it regularly helps to improve posture.
To do this:
- Lying with your stomach on the floor, press into your hands as you tuck your toes under your feet and lift your heels.
- Lift your knees and hips to bring your sitting bones up toward the ceiling.
- Bend your knees slightly and lengthen your spine.
- Keep your ears in line with your upper arms or tuck your chin all the way into your chest.
- Press firmly into your hands and keep your heels slightly lifted.
- Remain in this pose for up to 1 minute.
8. Pigeon pose
This is a hip opener that also loosens up your spine, hamstrings, and glutes. The pigeon pose can also help to stretch your sciatic nerve and quadriceps. Opening and stretching these places in your body makes it easier to correct imbalances in your posture.
To do this:
- Come down on all fours with your knees below your hips and your hands a little bit in front of your shoulders.
- Bend your right knee and place it behind your right wrist with your right foot angled out to the left.
- Rest the outside of your right shin on the floor.
- Slide your left leg back, straighten your knee, and rest your thigh on the floor.
- Make sure your left leg extends straight back (and not to the side).
- Slowly lower your torso down to rest on your inner right thigh with your arms extended in front of you.
- Hold this position for up to 1 minute.
- Slowly release the position by walking your hands back toward your hips and lifting your torso.
- Repeat on the left side.
The bottom line
The modern workplace doesn’t invite much movement, and sitting all day can be detrimental to your health. Still, you can do a lot to improve your health just by improving your posture. Investing in a few ergonomically designed products and learning to sit properly can go a long way to reducing wear and tear on your muscles and bones. Over the course of your career, this can really pay off as you avoid injuries, strains, and soreness.


